Looking for Portraits?
enp anniversary, maternity, and newborn portrait offerings coming soon
Join the Waitlist

This day and age, calligraphers are not hard to come by. And there are some really amazing wedding signage calligraphers and wedding invitation designers out there! So my number one recommendation to any bride with a flexible budget will always be to trust the professionals. BUT that’s not always a financial reality for a lot of brides. Or, maybe you’re like me, and you have enough creative comfortability that you want your wedding to have a personal touch with some DIY signage or calligraphy. If that’s you, you need to know this one hack that will make wedding signage STUPID easy! It’s CANVA!! Canva is a great place to DIY your wedding signs, invitation, menus, and any other printing need you have.
Canva is an accessible, free graphic design website that has pre-made elements, typefaces, and templates to make it easier than ever to try your hand at graphic design. When I was planning my wedding, Canva was my go-to for any sort of document or design I needed. I even created my own wedding invitations using Canva (though I did pay to upgrade to Pro to add my own fonts and access premium artwork elements). But one use for Canva that I came up with that saved me HOURS of time and frustration was designing my windowpane welcome sign!

Thanks to a combination of Canva and Facebook Marketplace, my windowpane welcome sign cost me exactly $0! Here’s how I did it:
Find a Glass Windowpane on Facebook Marketplace
This sounds like a super niche thing for people to sell, but you’d be surprised how many listings are out there! Especially now that weddings have utilized these rustic, repurposed elements for easy, DIY wedding decor. I found my windowpane for free as long as I could come pick it up. The seller even had more, but I knew I only needed one and they were fine splitting up the set.
Even if you have to pay a little bit, it should be much cheaper than ordering a sign at Kinkos or commissioning work from a designer.
Clean Thoroughly!
Now that you have your window, it’s time to make sure it’s squeaky clean. You’ll want a cleaning rag, some simple green, glass cleaner, and a lint-free cloth or coffee filter. Start on the frame and get all the gunk and gook out of the grooves of your windowpane. You may even try a toothbrush to clean out any hard-to-reach crevices. Then take your lint-free cloth (a coffee filter also works wonders!) and finish the piece off with some glass cleaner. Make sure there are no streaks or specks of dust left behind so you have a clean canvas to work with!
Plan Each Windowpane
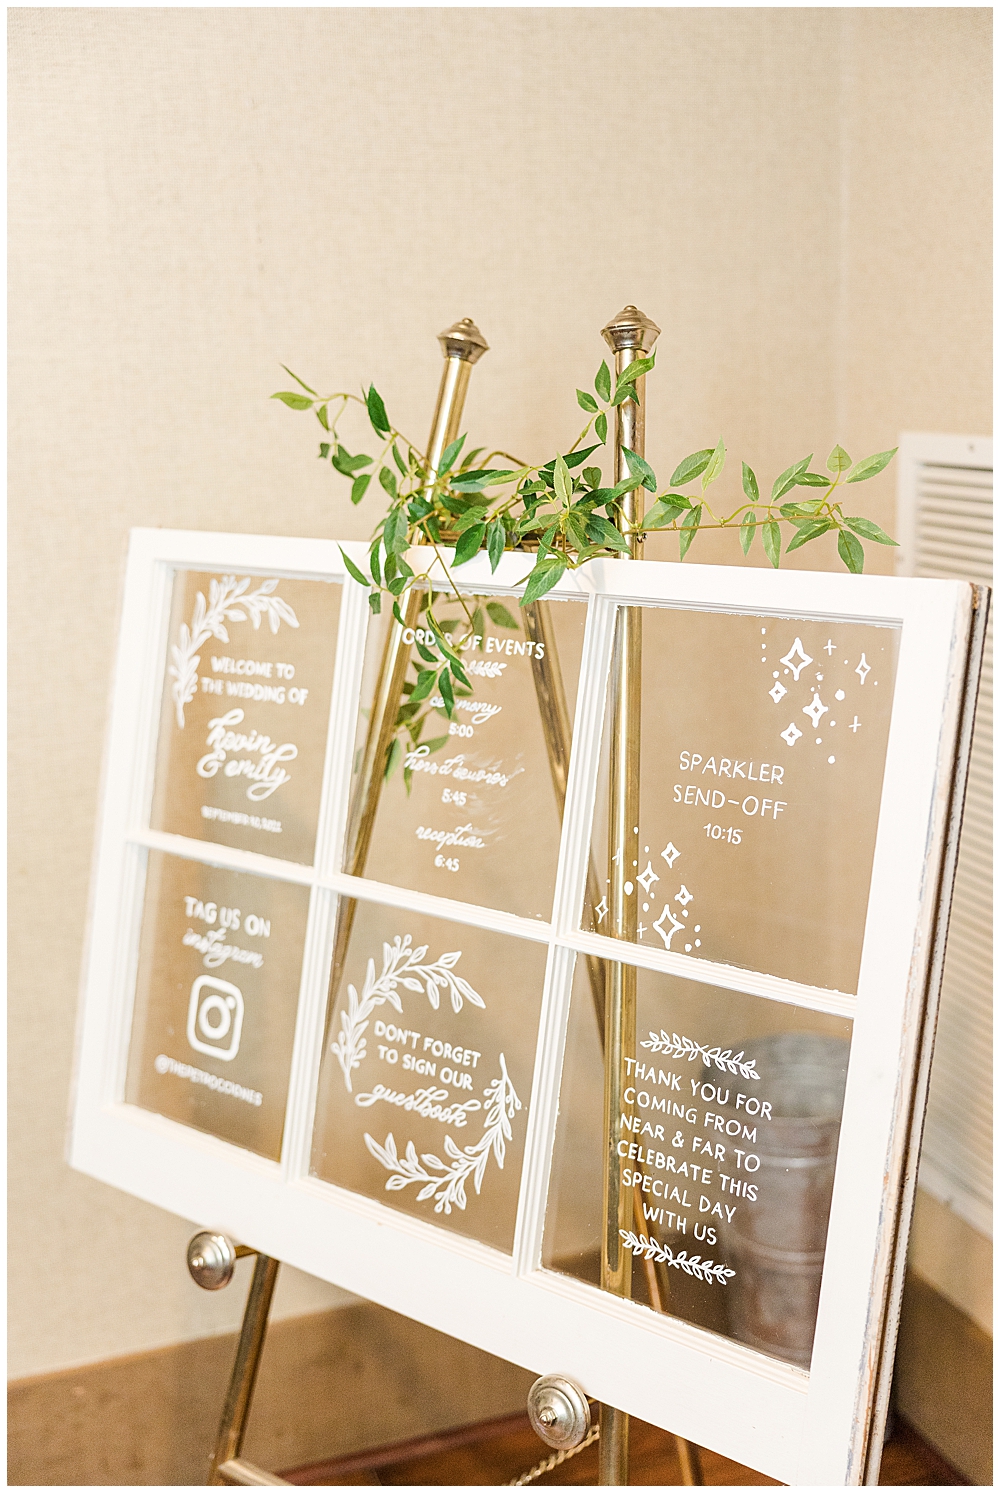
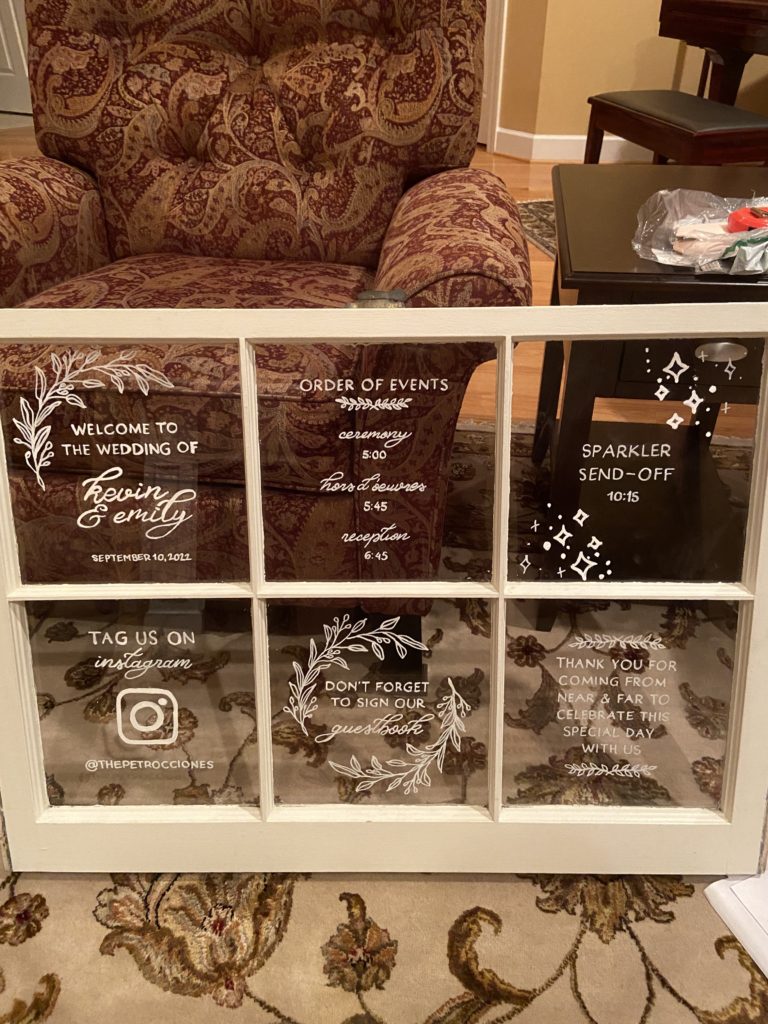
The next step is to account for each windowpane square. My window was a 3×2 windowpane, so I had 6 squares of design to figure out. I hopped on Pinterest to get some inspiration and ultimately decided to use it as a welcome sign, program, and reminder of when the sparkler exit would be. Once I jotted down the purpose of each pane in my window, I got to work on the design.
Hop On Canva
If you don’t already have one, create a free account on Canva.com! This is as easy as using a Gmail or Facebook login, or creating a new account with an email and password of your choosing. Once you’re on, poke around! You’ll be amazed at the choices you have with the free account. But if you see anything with a little crown symbol on it, that’s a premium feature. I ultimately upgraded to premium to have full access to their design library, but this isn’t necessary at all. Just personal preference.
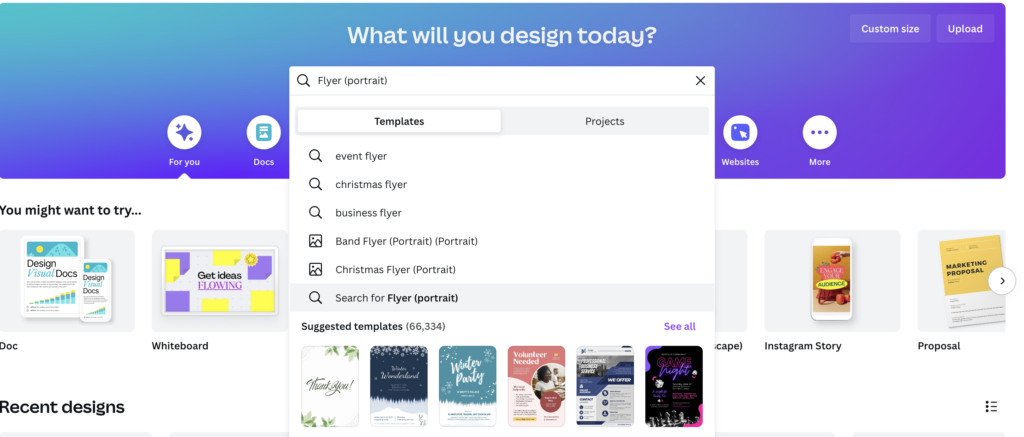
Create a Blank Flyer (Portrait)
Once you’re in Canva and familiar with how it works, open a new Flyer template in portrait mode. Below are some screenshots to get you there. Search for Flyer in the search bar, and hit your enter key or click the bottom option with the magnifier glass.
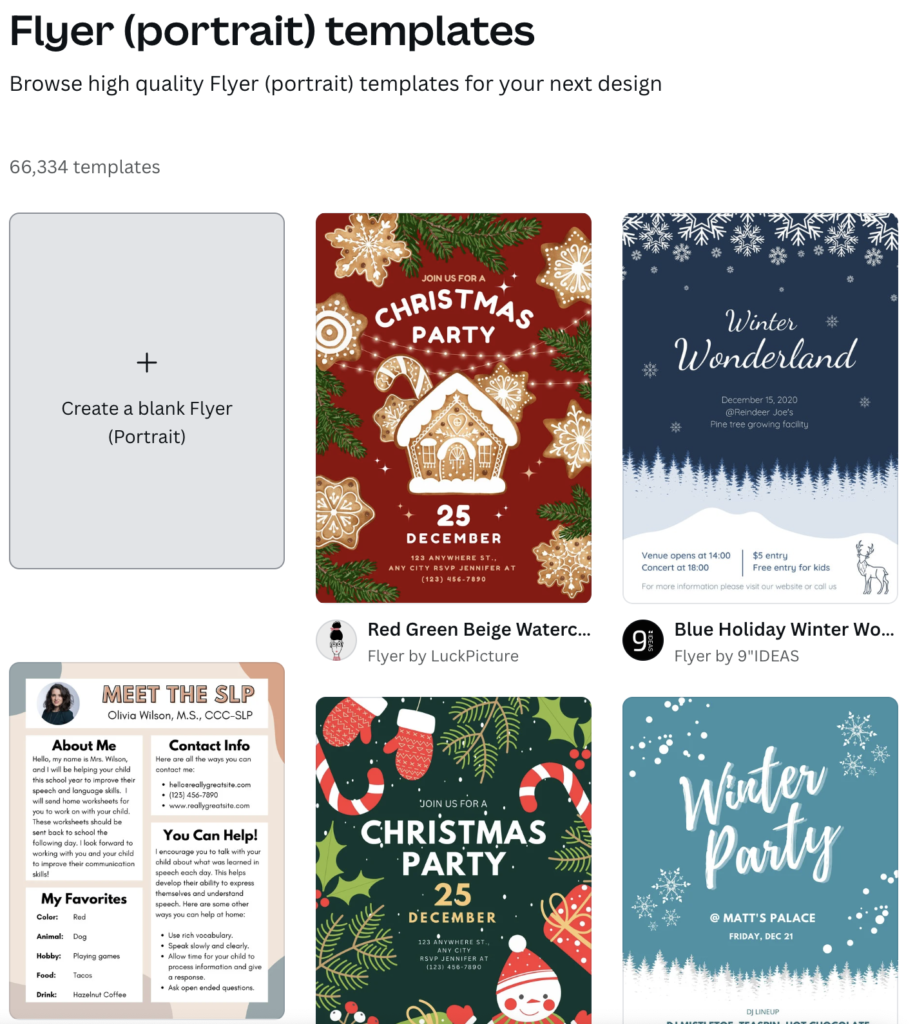
After that you’ll see a bunch of pre-designed templates to pick from. You can choose one of these if you like, but remember we’re just creating a traceable document with text and very simple design elements. So don’t choose anything that you don’t want to trace over in marker. I recommend creating a blank flyer by clicking the grey square at the top left.
Design Each Window Pane on a Separate Page
Once you have your blank design, the world is your oyster. Play around with typefaces, and even try searching for hand drawn graphics or floral designs in the elements tab on the left. If you’d like the exact template I used for my window, I have a free download link for you to customize for yourself! Just click HERE. But remember I had Premium, so you may need to swap out some of the elements with free alternatives. Poke around and see what you like for your Canva wedding signs.
Save and Print
Once you’re happy with your design, click the Share button at the top right of your screen. Then click Download. If you click Print, it will take you to get your design printed by Canva which comes at a cost. This isn’t really necessary for this purpose, but a great thing to keep in your back pocket for things like table cards, invitations, or other print products you may need for your wedding! Once you’ve downloaded your design, print it in black and white on normal 8.5×11 inch printer paper.
Tape to the Back of Each Windowpane
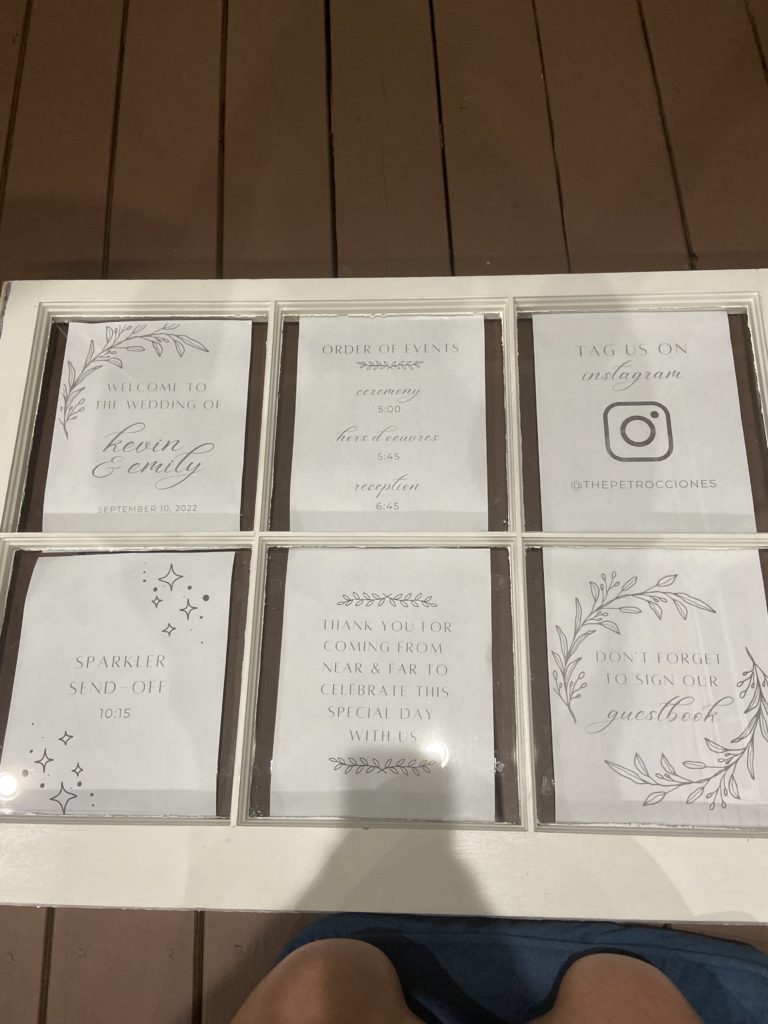
Now that you have your design, it’s time to decide how to lay it out on your window! Play around with the order of each page and where they’ll go until you’re satisfied. Then tape the paper to the BACK of the glass on each pane. Ignore the embarrassingly bad quality photo from my iPhone, but you can see here as I was trying to figure out which design would go in what pane.
Trace in White Glass Marker or Paint Marker
Now comes the trickiest part… tracing your design. If you have a steady hand, you’re golden. But it may take a few tries to get used to so I recommend working on a piece of the design that’s easier (usually some text or a simple part of the floral embellishments). Use a white glass marker or fabric paint marker for this. And for goodness sake… use FINE tip! Even with a fine tip, I had to find a technique for holding and pulling the marker away quick to make sure the paint didn’t pool out suddenly and leave puddles of paint where there were supposed to be fine markings.
Tips for Mess-Ups
If your paint marker does end up being finicky and pooling paint, or if you mess up on your own, there’s an easy way to fix! Just grab some nail polish remover and Q-tips! Pour a little of the polish remover out into a small dish and dip the Q-tip in it. Then smudge out the flawed areas and fan it with your hand or a piece of paper/magazine to dry the area.
Finishing Your Canva Wedding Signs
And that’s it! After some dry time, you may choose to spray over your design with a clear paint polish from the hardware store, or just a spritz of hairspray. Or leave alone, but take great care not to let anything touch the painted design or it may chip/scratch. And now you have a cute, DIY Canva option for your wedding signs! You can use this same technique with acrylic table numbers, photo frames with no back to them for menus or table charts, etc. The possibilities truly are endless with a little creativity!
Did you love this tip? I have lots more in my Wedding Tips category of the blog! Check these posts out next:
The flowers will fade and guests will forget what your dress looked like... but you'll remember every emotion-filled moment for a lifetime when you choose our team to create effortless, intimate and artful wedding photos.
Let us preserve your memories.


Inquire Now


